Android has a great media library allowing all sorts of things. Until recently though, there was no way to encode/decode audio/video giving developers the ability to do literally anything. Fortunately Jelly Bean release introduced the android.media.MediaCodec API.
The API is designed following the same principles/architecture of  OpenMAX, a well known standard in the media Industry.
Transitioning from a pure high level MediaPlayer to the encoder/decoder level can be a big pain though. There is a lot more to be aware of when you are manipulating the tiny little bits that make great media 🙂
In this post I will describe how to use the API, highlighting the essential things to be aware of.
1.Get To Know Your Media
Another new class introduced in Jelly Bean is the android.media.MediaExtractorIt is pretty clear what it is all about, extract the metadata from your media and a lot more.
AssetFileDescriptor sampleFD = getResources().openRawResourceFd(R.raw.sample);

MediaExtractor extractor;
MediaCodec codec;
ByteBuffer[] codecInputBuffers;
ByteBuffer[] codecOutputBuffers;

extractor = new MediaExtractor();
extractor.setDataSource(sampleFD.getFileDescriptor(), sampleFD.getStartOffset(), sampleFD.getLength());

Log.d(LOG_TAG, String.format("TRACKS #: %d", extractor.getTrackCount()));
MediaFormat format = extractor.getTrackFormat(0);
String mime = format.getString(MediaFormat.KEY_MIME);
Log.d(LOG_TAG, String.format("MIME TYPE: %s", mime));
2. Create your Decoder
A decoder is generally seen as a NODE with INPUT and OUTPUT buffers. You take an input buffer from it, fill it and give it back to the decoder for decoding to take place. On the other side of the NODE, you take an output buffer and “render” it. This example will play an audio sample file using the android.media.AudioTrack API.
codec = MediaCodec.createDecoderByType(mime);</pre>
codec.configure(format, null /* surface */, null /* crypto */, 0 /* flags */);
codec.start();
codecInputBuffers = codec.getInputBuffers();
codecOutputBuffers = codec.getOutputBuffers();

extractor.selectTrack(0); // <= You must select a track. You will read samples from the media from this track!
3. It`s All About Buffers
Let the Buffer party begin 🙂 See bellow how the INPUT side of the decoder is managed:
int inputBufIndex = codec.dequeueInputBuffer(TIMEOUT_US);</pre>
if (inputBufIndex >= 0) {
    ByteBuffer dstBuf = codecInputBuffers[inputBufIndex];

    int sampleSize = extractor.readSampleData(dstBuf, 0);
    long presentationTimeUs = 0;
    if (sampleSize < 0) {
        sawInputEOS = true;
        sampleSize = 0;
    } else {
        presentationTimeUs = extractor.getSampleTime();
    }

    codec.queueInputBuffer(inputBufIndex,
                           0, //offset
                           sampleSize,
                           presentationTimeUs,
                           sawInputEOS ? MediaCodec.BUFFER_FLAG_END_OF_STREAM : 0);
    if (!sawInputEOS) {
        extractor.advance();
    }
 }
And now how to pull OUTPUT buffers with the decoded media from the decoder:
final int res = codec.dequeueOutputBuffer(info, TIMEOUT_US);</pre>
if (res >= 0) {
 int outputBufIndex = res;
 ByteBuffer buf = codecOutputBuffers[outputBufIndex];

 final byte[] chunk = new byte[info.size];
 buf.get(chunk); // Read the buffer all at once
 buf.clear(); // ** MUST DO!!! OTHERWISE THE NEXT TIME YOU GET THIS SAME BUFFER BAD THINGS WILL HAPPEN

 if (chunk.length > 0) {
 audioTrack.write(chunk, 0, chunk.length);
 }
 codec.releaseOutputBuffer(outputBufIndex, false /* render */);

 if ((info.flags & MediaCodec.BUFFER_FLAG_END_OF_STREAM) != 0) {
 sawOutputEOS = true;
 }
} else if (res == MediaCodec.INFO_OUTPUT_BUFFERS_CHANGED) {
 codecOutputBuffers = codec.getOutputBuffers();
} else if (res == MediaCodec.INFO_OUTPUT_FORMAT_CHANGED) {
 final MediaFormat oformat = codec.getOutputFormat();
 Log.d(LOG_TAG, "Output format has changed to " + oformat);
 mAudioTrack.setPlaybackRate(oformat.getInteger(MediaFormat.KEY_SAMPLE_RATE));
}
And that’s it. This is the most simple usage of this such powerful API. For further questions send me a note and I’ll give you more insights…

Along the years developers came up with different solutions to managing application multi threading requirements. The rule of thumb is to move everything to the background and only perform UI related operations in the Android application UI thread.

It sounds easier than it it, lots of calls seem innocent but affect performance in unpredictable ways. Android has several classes within the framework to help developers to move operations to the background. The main problem is that all of them still require developers to have a solid knowledge about multi threading.

The AsyncTask class has been available since API level 3 and has been over used for quite a long time. It’s miss usage causes several problems with regards to memory leaks and attempts to access UI elements once completed after the Activity has been destroyed while the execution was being performed in the background.

Lets take a look at a typical usage of AsyncTask bellow:

public class AsyncTaskActivity extends AbstractTestActivity {

 protected void onComplexMathButtonClicked() {
     new AsyncTask() {
         @Override
         protected Double doInBackground(Double... params) {
             try {
                 Thread.sleep(3000); // A long complex calculation...
             } catch (InterruptedException e) {
                // Nothing to do here...
             }
             return params[0] * -1;
         };

         protected void onPostExecute(Double result) {
             onCalculationCompleted(result);
         };
     }.execute(Math.random() * 100);
 }

 protected void onNetworkButtonClicked() {
     new AsyncTask() {
         @Override
         protected String doInBackground(String... params) {
             try {
                 Thread.sleep(5000); // A long network operation...
             } catch (InterruptedException e) {
                 // Nothing to do here...
             }
             final StringBuffer content = new StringBuffer(params[0]);
             return content.reverse().toString();
         }

         protected void onPostExecute(String result) {
             onRequestCompleted(result);
         };
     }.execute("www.google.com");
 }
}

Lets look at a few problems that arise with the AsyncTask usage:

  1. If an activity gets destroyed by a configuration change or if the user leaves the application while the doInBackground(…) is being executed, once the onPostExecute(…) method gets called you will improperly access UI elements and the application will probably crash;
  2. The nature of the AsyncTask class allows a usage model often called “fire and forget” as shown above where you call new AsyncTask<…>().execute(); This anonymous inner classes very often cause issues related to memory leaks, specially when a Context object is used within the class.

Lets sit back and think what developers actually need!? They need to be able to execute actions in the background and report these action’s results on the UI thread. How is it possible to support such model without the need to manage multi threading complexity???

Let me handle it for you 🙂 Look at the library project at https://github.com/dpsm/org.dpsmarques.android

So lets imagine an ideal scenario… The simplest you could get is to have a method to be overrriden where you could implement background operations and another where the results would be delivered into the UI thread for you 🙂

@Override
protected ViewUpdateData handleControllerAction(ControllerAction action) {
    ViewUpdateData result = null;
    switch (action.code) {
        case OP_COMPLEX_MATH_TEST:
            result = onComplexMathOperation((Double)action.param);
            break;
        case OP_NETWORK_TEST:
            result = onNetworkOperation((String)action.param);
            break;
    }
    return result;
 }

private ViewUpdateData onNetworkOperation(String url) {
    try {
        Thread.sleep(5000); // A long network operation...
    } catch (InterruptedException e) {
        // Nothing to do here...
    }
    final StringBuffer content = new StringBuffer(url);
    return ViewUpdateData.obtain(OP_NETWORK_TEST, content.reverse().toString());
 }

@Override
protected void handleViewUpdate(AsyncTestActivityView view, ViewUpdateData data) {
    switch (data.action) {
        case OP_COMPLEX_MATH_TEST:
            view.onMathOperationCompleted((Double) data.result);
            break;
        case OP_NETWORK_TEST:
            view.onNetworkOperationCompleted((String) data.result);
            break;
    }
}

The pattern above provides you two places to execute background and foreground operations:

  • protected ViewUpdateData handleControllerAction(ControllerAction action);
    Here’s the callback you always wanted! This method gets called on the background thread and you can do any heavy weight operation without any concerns;
  • protected void handleViewUpdate(AsyncTestActivityView view, ViewUpdateData data);
    The method above sounds cool, but how do I send UI updates once my background actions are completed? As shown in the code above, you need to create ViewUpdateData instance and return it. Once you return from the background method above, the object will get delivered to your handleViewUpdate(…) method as shown above.

For a full example look at the code example and the library code you need to use the pattern at https://github.com/dpsm/org.dpsmarques.android

Honeycomb introduces a new concept called fragments to allow developers to have more dynamic user interfaces and fight device fragmentation problems. My first experimentation with it was prototyping my Google Doodles application using fragments. Here’s the results:
Landscape Mode:

Portrait Mode:

For further details on the fragments API see: http://developer.android.com/guide/topics/fundamentals/fragments.html


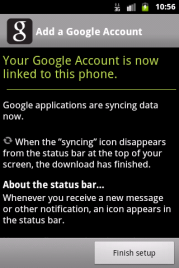
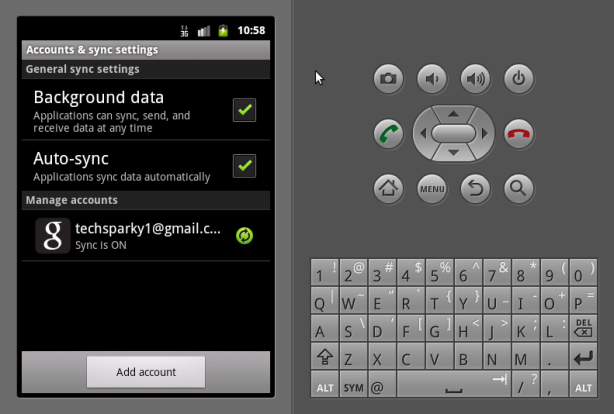
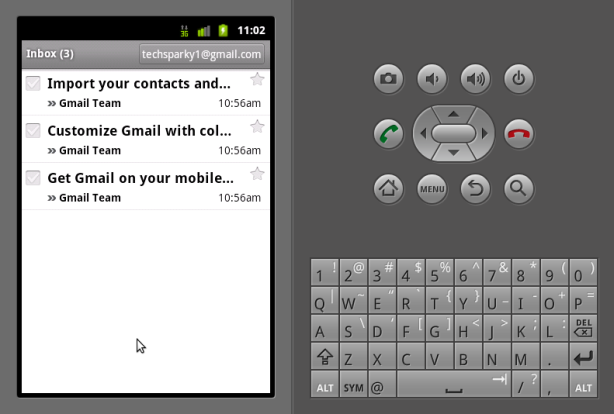
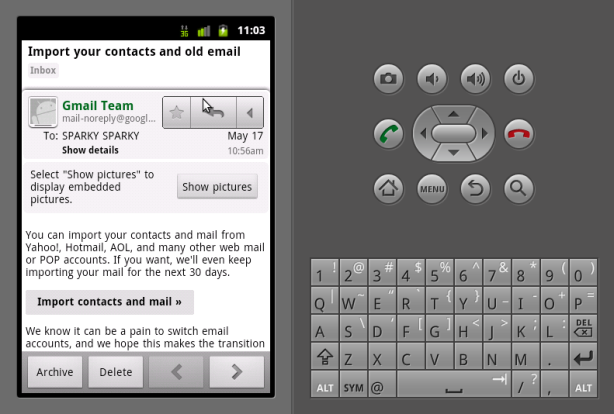
AOSP builds have always missed the fun of having the Google applications shipped within it. I have recently decided to change that, by giving a shot in order to integrate both and create a tuned emulator version. The reason why Google apps are not inside the AOSP is because there are big pieces of IP (Intellectual Property) that belongs to Google inside it.

Fortunately some groups have created update zip files to be used by the Android recovery system that installs the apps on custom Android builds. I have extracted the APKs and all the files required to run Google apps from the zip file and included them to the AOSP build system. It required creating a few makefiles and hooking new modules into the default “full” product, most things that anyone familiar with the AOSP could do in a few hours 🙂

Hacking Result

Account Login

Account Management

Google Mail Application

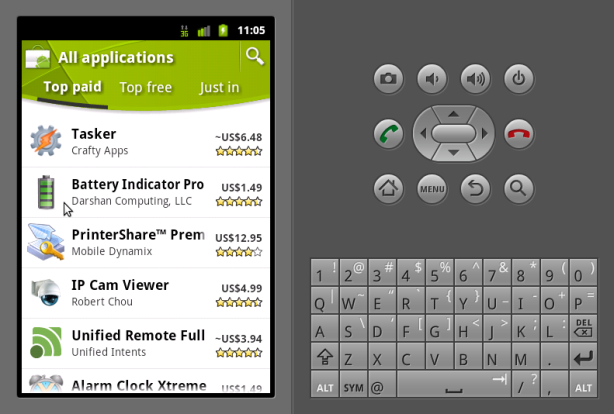
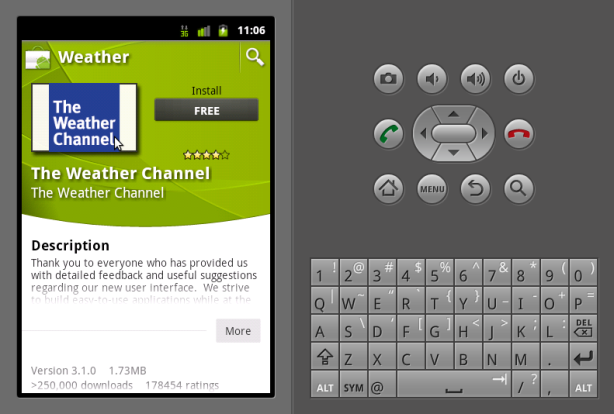
Google Market Application

Google Maps Application

Google Books Application

YouTube Application

NOTE: Device Vendors MUST go through the official process for distributing Google Applications within its devices.

For more information, please go to http://www.google.com/mobile/android/

Have you lost signal?

Posted: April 27, 2011 in Android

In this post I will show you how Android devices interact with the network in order to retrieve network information and registration states.

The main component responsible for service state and information retrieval is the com.android.internal.telephony.ServiceStateTracker class. In case of GSM networks which is our target network technology, there is a GSM specific subclass called  com.android.internal.telephony.gsm.GsmServiceStateTracker.

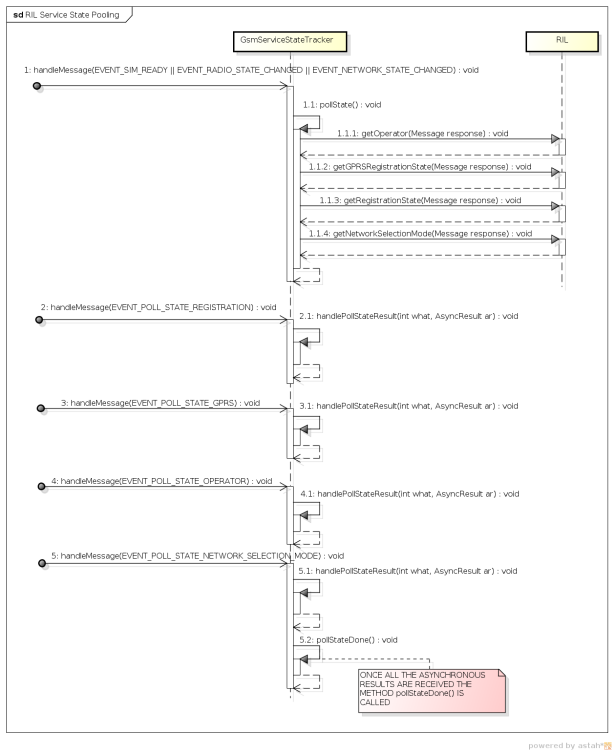
The BIG picture:

As you can see in the diagram above, the service state pooling is triggered after one of the three asynchronous events that are posted by the com.android.internal.telephony.RIL class:

  • EVENT_SIM_READY
  • EVENT_RADIO_STATE_CHANGED
  • EVENT_NETWORK_STATE_CHANGED

Since the pooling process relies on asynchronous information that is queried to the com.android.internal.telephony.RIL class, Android puts all 4 asynchronous calls into a context in order to be able to ignore late responses that arrive after a new pooling has been triggered.

Its implemented using a pooling context as shown bellow:

private void pollState() {
    pollingContext = new int[1];
…
}

protected void handlePollStateResult (int what, AsyncResult ar) {
    // Ignore stale requests from last poll
    if (ar.userObj != pollingContext) return;
…
}
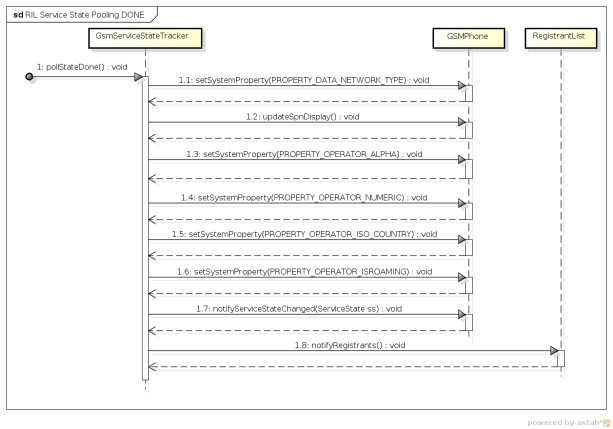
Once all asynchronous results arrive, it calls the poolStateDone(…) function in order to update the current service state and post the state update to the rest of the system. Now that you have the big picture drawn in your mind, I will show what kind of information the phone retrieves from the network.

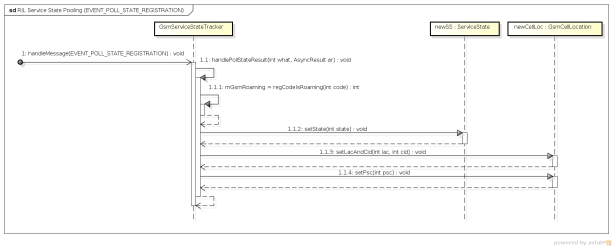
EVENT_POLL_STATE_REGISTRATION

The registration state wraps information such as whether the phone is registered in a Home or Roaming network, the registration state and detailed network information such as the Cell Id (CID) and Location Area Code (LAC) as shown bellow:


 EVENT_POLL_STATE_GPRS
The GPRS registration state information is quite similar to the EVENT_POLL_STATE_REGISTRATION, it wraps the service state, the roaming information and the network technology type as shown bellow:


EVENT_POLL_STATE_OPERATOR
The operator state wraps the Network Short and Long names that we see on the notification bar and lock screens and the Network Code (MCC+MNC) as shown bellow:


EVENT_POLL_STATE_NETWORK_SELECTION_MODE
The last piece of information retrieved is the selection mode. Selection mode defines whether the underlying baseband modem should do automatic network search/selection or manual selection based on the latest registered networks. See code flow bellow:


Once all the information queried to the network has arrived, the system switches the current network state information by the new one recently queried. The pollStateDone(…) method does all the comparison between the old and new states and notifies all the registered observers interested in network state changes such as registration, roaming, location changes, etc. It also sets a few important   system properties that are used by the entire system in order to resolve network related information and shown bellow:

I hope you got your signal back now 🙂 

NOTE: All this article information is based on the Android Open Source Project source code. For details see http://source.android.com/.

SP-GTUG Android 101 Talk

Posted: March 18, 2011 in Uncategorized
Last Friday I finally got the change to meet the local GTUG members. I was a great night in which I gave a talk on Android 101. We are committed to create a community around Google Technology and me personally around Android!

Google Doodles for Android

Posted: January 3, 2011 in Uncategorized
If you are a Google fan or if you just love the doodles from Google`s web site. Now you can have them all in your Android device. Goodles application includes a widget that displays the doodles form your doodle gallery.

Dedicated to All Google Fans!


Will be glad to get your feedback and suggestions for future updates!!

How to keep yourself in the Loop!

Posted: September 6, 2010 in Android
Tags:

Android has many background processing going on, however it is not very clear at first start how it works. The most general way of doing background tasks and preserving the UI thread is by using android.os.Handler instances. So what is this Handler all about!?

First of all we need to talk about the android.os.Looper class. It is literally a looper, which means that it loops inside a thread run() method waiting for messages to be posted at its message queue in order to be dispatched. Every Looper instance is composed of an andorid.os.MessageQueue instance that queues android.os.Message objects.

What links the Looper and the Handler classes together is the MessageQueue. Every handler is tightly related to a looper instance, dispatching all messages sent to it into the looper’s queue. As soon as the looper consumes the message from the queue, it will dispatch it to the message’s target handler. Note that every looper runs inside one thread and each thread can only have one associated looper, so all you need to do in order for handlers to work correctly is to make sure your handler is tightened to a looper running on the right thread instance.

See the Looper.loop(); method code bellow:

    /**
     *  Run the message queue in this thread. Be sure to call
     * {@link #quit()} to end the loop.
     */
    public static final void loop() {
        Looper me = myLooper();
        MessageQueue queue = me.mQueue;
        while (true) {
            Message msg = queue.next(); // might block
            if (msg != null) {
                if (msg.target == null) {
                    // No target is a magic identifier for the quit message.
                    return;
                }
                msg.target.dispatchMessage(msg);
                msg.recycle();
            }
        }
    }

So in order to create a Looper and attach it to a Thread instance see code bellow:

public void run() {
	Looper.prepare();
	mHandler = new Handler() {
		@Override
		public void handleMessage(Message msg) {
			...
		}
	};
	Looper.loop();
}

The prepare method creates a Looper and associates it to the current running Thread. This is accomplished by using a java.lang.ThreadLocal field, which stores different Looper instances for each thread as shown bellow:

public static final void prepare() {
    if (sThreadLocal.get() != null) {
        throw new RuntimeException("Only one Looper may be created per thread");
    }
    sThreadLocal.set(new Looper());
}

Wait… When was the Handler instance attached to the Looper in the code above ??? The Handler object was not passed anywhere! Well, the magic happens inside the Handler class’ default constructor as shown bellow:

public Handler() {
	// Gets the looper associated to the current thread
	mLooper = Looper.myLooper();
	if (mLooper == null) {
		throw new RuntimeException(
			"Can't create handler inside thread that has not called Looper.prepare()");
	}
	// Gets the looper's queue in order to enqeue the
	// dispatched messages in. See sendMessage methods.
	mQueue = mLooper.mQueue;
	mCallback = null;
}

Now we have a Handler associated to the current thread’s looper message queue. Every sendMessage method will enqueue the message object and the looper will consume the enqueued message on its associated thread. See one of the many sendMessage method flavors bellow:

public boolean sendMessageAtTime(Message msg, long uptimeMillis)
{
	boolean sent = false;
	MessageQueue queue = mQueue;
	if (queue != null) {
		msg.target = this;
		sent = queue.enqueueMessage(msg, uptimeMillis);
	}
	else {
		RuntimeException e = new RuntimeException(
			this + " sendMessageAtTime() called with no mQueue");
		Log.w("Looper", e.getMessage(), e);
	}
	return sent;
}

Are you on the Loop now? I hope so!!!

After working with Android telephony for a while and learning about it mostly by looking at the code, I realized that there was not enough documentation about it besides the code itself. This post will provide detailed walk through about the java telephony internals.

The android telephony architecture is split between java and native code. As of today there is a clear documentation about the native layer (http://pdk.android.com/online-pdk/guide/telephony.html), however there is no documentation about the java layer architecture itself.

The android framework classes interact with the Phone API (com.android.internal.telephony.Phone) through two basic method types. Both are based on asynchronous message exchanges.

public void get[…](Message response);

The first type provides a way to get radio and/or network related information asynchronously by passing an android.os.Message class instance. The message will be delivered to the message’s handler when the response from the underlying radio interface layers becomes available.

public void registerFor[…](Handler h, int what, Object obj);

The second type provides a way to get radio/network state updates by registering to receive response messages of the specified type (what parameter) to the specified handler (h parameter) and an optional user object (obj parameter) within the message instance.

The first type of method will call the underlying com.android.internal.telephony.RIL class directly, passing down the message object to be dispatched when the response is available from the underlying layers. The second type may have one or more android.os.Handler instances registered for status updates, they are wrapped on android.os.Registrant objects as weak references in order to allow them to be garbage collected. Because they are not referenced anywhere else, it does not worth sending updates or keeping track of them. The registrants for each register method are stored on android.os.RegistrantList instances so they can be referenced for the future updates.

The communication between the java and native layers is done through a Linux local socket. Every request to the native layer is wrapped into an instance of the com.android.internal.telephony.RILRequest class in order to keep the request information stored until the response is returned the bottom layers. When the response arrives the RILRequest object for the original request will be retrieved from the pending requests list in order to resolve the destination handler to dispatch the response to. The RILRequest class has the following attributes in order to keep the request information:

  • int mSerial; // The request sequence number
  • int mRequest; // The request code
  • Message mResult; // The result message to be dispatched upon response
  • Parcel mp; // The parcel where the raw data will be written and sent though the socket

Once the request object is retrieved or created from the requests pool, every public void get[…](Message response); method will write its parameters (if any) into the request object’s Parcel instance field(mp) and send it to the com.android.internal.telephony.RIL.RILSender class. The RILSender class is a handler that runs on its own looper thread, waiting for new RIL requests to be sent to the native layers through the socket connected to the  RIL daemon as shown on the diagram above. The sender main responsibilities are to store the request object instance into the pending requests list, marshall the parcel into a raw byte array and send it through the socket. The raw request format is specified bellow:

Right now you already know how the requests are sent down to the native layers, but how the request handlers get the response messages back? The com.android.internal.telephony.RIL.RILReceiver class runs on its own thread listening on the RIL daemon socket for asynchronous responses. Its main responsibilities in opposition to the RILSender are to unmarshall the raw data into an android.os.Parcel, process the response and dispatch it inside a message object to its target handler.

There are two kinds of responses that come from the native RIL, solicited and unsolicited commands (see details at http://pdk.android.com/online-pdk/guide/telephony.html). The raw response format for the response types is specified bellow:

Solicited Commands:

Unsolicited Commands:

In conclusion, the java and native layers communicate with each other asynchronously through a socket passing requests/responses up and down the stack.

NOTE: All this article information is based on the Android Open Source Project source code. For details see http://source.android.com/.

Hope you all the best,

David Marques